Pages

Showing posts with label dessert. Show all posts

Thursday, June 20, 2013

Thursday's Treat: Ice Cream Addicts Anonymous

I've been super lazy lately and haven't made any treats.

Ok that's not completely true, I just took photos of them on Sprinkles the Ipad, and haven't remembered to transfer them over so I can share them with you.

So I felt guilty about not sharing my bad eating habits with you, so instead I'm giving you a ranking of my FAVORITE ice creams. Sorry if this is cruel.


5. Ba-Nom-A-Nom.
Denver, CO + metro area. Strawberry-Banana.


This is a food truck... and it is not technically ice cream... but I let it slide since it is sooo good.
What is Ba-Nom-A-Nom? Frozen soft-serve fruit. No dairy, gluten, sugar, or anything else but frozen fruit.  It's actually super creamy and the flavors are super refreshing - like watermelon!


4. Amy's Ice Cream.
Austin, TX. Bourbon Chocolate Walnut.


Apparently I eat my ice cream too fast since I have no pictures of my many visits here.
 

Located throughout Austin (and popping up in other Texas cities) is Amy's. A must go if you are visiting, especially if you have a friend who used to work there and make you delicious combo flavors like Bourbon Chocolate Walnut mixed with Baileys.

3. Lik's Ice Cream.
Denver, CO. Mexican Chocolate.


On an unassuming corner in Capitol Hill is Lik's. I was super excited to find a place in Colorado that has Mexican Chocolate. It was delicious and loaded with cinnamon.

2. Jenni's Splendid Ice Cream.
Columbus, Ohio + your local specialty market. Milkiest Chocolate in the World.


I'm kind of ashamed to say how much money I spend on Jeni's ice cream. It is SO good, I never want another basic chocolate cone in my life. Totally worth every penny of the $12 it will cost you to take home a pint.


And the winner is.......


1.  Herrell's Ice Cream. 
Northampton, MA + Huntington, NY. Mexican Chocolate, you will always have my heart.


Look how happy Steve is!


Copious amounts of jimmies.


First off, there is nothing quite like Herrell's ice cream shops. Basically Amy (#4) got her idea for her shop while studying at Tufts University and eating at Steve Herrell's original shop in Boston. People also contribute the idea for Cold Stone and all those all mix-in shops back to Steve. All the flavors are delicious, and Western Mass will kick you out if you say no to the real chocolate jimmies (sprinkles) offered with every scoop. I'm pretty sure they put cocaine in their Mexican Chocolate, and that is why they stopped making it, and why I'm still going through withdrawal symptoms.

xxCharlotte

P.S. Can you eat too much ice cream?

Thursday, May 30, 2013

Thursday's Treat: Blackberry Mini Pies & The Darling

Growing up in the Pacific Northwest meant heaping bounties of blackberries in the summer months. While the Himalayan Blackberry is actually an invasive plant, which can grow to be bigger than a house, it does provide some pretty tasty treats.


I shelled out for a bunch of fancy Whole Food berries when Christine came into town, but I has a tiny pint leftover. Too little to make a real pie, but too many to justify eating with whip-cream and sugar (don't judge). So I made this:

Blackberry Mini Pies

This is all you need:
  • 1/8 cups white sugar
  • Single pie crust (from here), or get lazy and buy a frozen pie crust (the rolled up kind - not the already in a pan kind)
  • 6 ounces of fresh blackberries
  • Butter (just a sliver, and don't try to subsitute this for anything else, just leave it out if you need to)
  • Tart pans (I use these) or a muffin pan

Hedgehog measuring cups help out the process a lot.

Steps:
1) Wash the berries and let them air dry while you create/defrost (frozen) dough.
2) Mix the berries with the sugar and leave to mix together
3) Roll the dough out, and create mini pie crusts by tracing around the edge of the tart pan + 1 inch.


3) Press the dough gently into the tart pans, and trim the excess off. Chill in the fridge for 2 - 3 minutes
4) Roll the edge of the dough over, tucking into the tart pan to make things pretty

5) Butter the bottom of the crust
6) Dump in some sugared blackberries
                              
7) Top the mini pies with the extra dough in a lattice work pattern
8) Bake at 350F for 10 minutes, or until the lattice work looks almost brown. Kill the heat and let sit in the oven for another 10-15 minutes.

9) Enjoy with ice cream, whipped cream, or a trashy magazine.

According to Caroline, I can't be a true yuppie because I don't have a cake stand.


P.S. Christine got me this Cupcake Royale plate for Christmas!


The Darling


I've been spending a lot of down time on porches and balconies lately, grilling, drinking, and people watching....
and last weekend Grant created this concotion:

1.5 ounces of Bourbon (he uses a bottle from Breckenridge Distillery)
1-2 ounce Schweppes Bitter Lemon soda
and 2-3 wedges of clementine
1) Muddle the clementine at the bottom of the glass
2) Pour in the bourbon, followed by the soda to taste
3) Mix and enjoy!
P.S. I totally helped him name it, that counts, right?! I thought of the song my Grandpa used to sing Oh My Darling, Clementine....which is actually a really sad song.
xxCharlotte

Thursday, April 25, 2013

Thursday's Treat: Banana Bread

I grew up in a household where bunches of bananas were bought...and then left untouched. Let's just say we had a lot of over-ripe banana treats growing up. Besides Banana Frosties (I will have to dig out the recipe for that one another day) the house favorite was Banana Bread.

I'm not sure what recipe my mom used....mostly because I've been too lazy to ever ask her... but she always ruined the bread dropping in my nemeses: walnuts. Ugh-  it's the worst thing you can do to a treat - make it all healthy and stuff.

Bananana Bread. 


I made this a long time ago based on this All Recipes one.

 Ingredients:

2 cups flour (all purpose)
3/4 cup brown sugar
1 stick of butter (1/2 cup) - softened
1/4 teaspoon salt
1 teaspoon baking soda
2 eggs, beaten
6 (yes, 6) large over ripe bananas

First off, if you don't want to wait until you have an abundance of over-ripe bananas floating around the house, I have a trick for you. Buy a bunch, put them in a brown paper bag for 2-3 days, and roll the end up and secure it. You will have ugly over-ripe bananas. OR you can go to your local 7-11 (many of them sell bananas) and I've had good luck finding a bunch when my local grocery store only had the green ones.

Seriously, you need a lot of these.


Steps:

1) Is your butter softened? Proceed to step 3. No? You are failing at this already- go to Step 2.
2) Let you butter sit out for an hour or two at room temperature. Do NOT microwave it. You will ruin everything. Softened? Go to step 3.
3) Turn your oven on, and to 350F.
4) Mash all the ripe bananas together in a bowl or glass measuring cup. I have good luck using a fork. Do NOT blend them it will be too smooth and not very rustic. You should have over 2 cups of banana mush.

Mutilated bananas.


5) Combine flour, salt, and baking soda in a large bowl. Sift together.
6) In bowl #2, mix together soft butter and brown sugar, until it is almost a paste..a delicious paste.

Delicious paste!

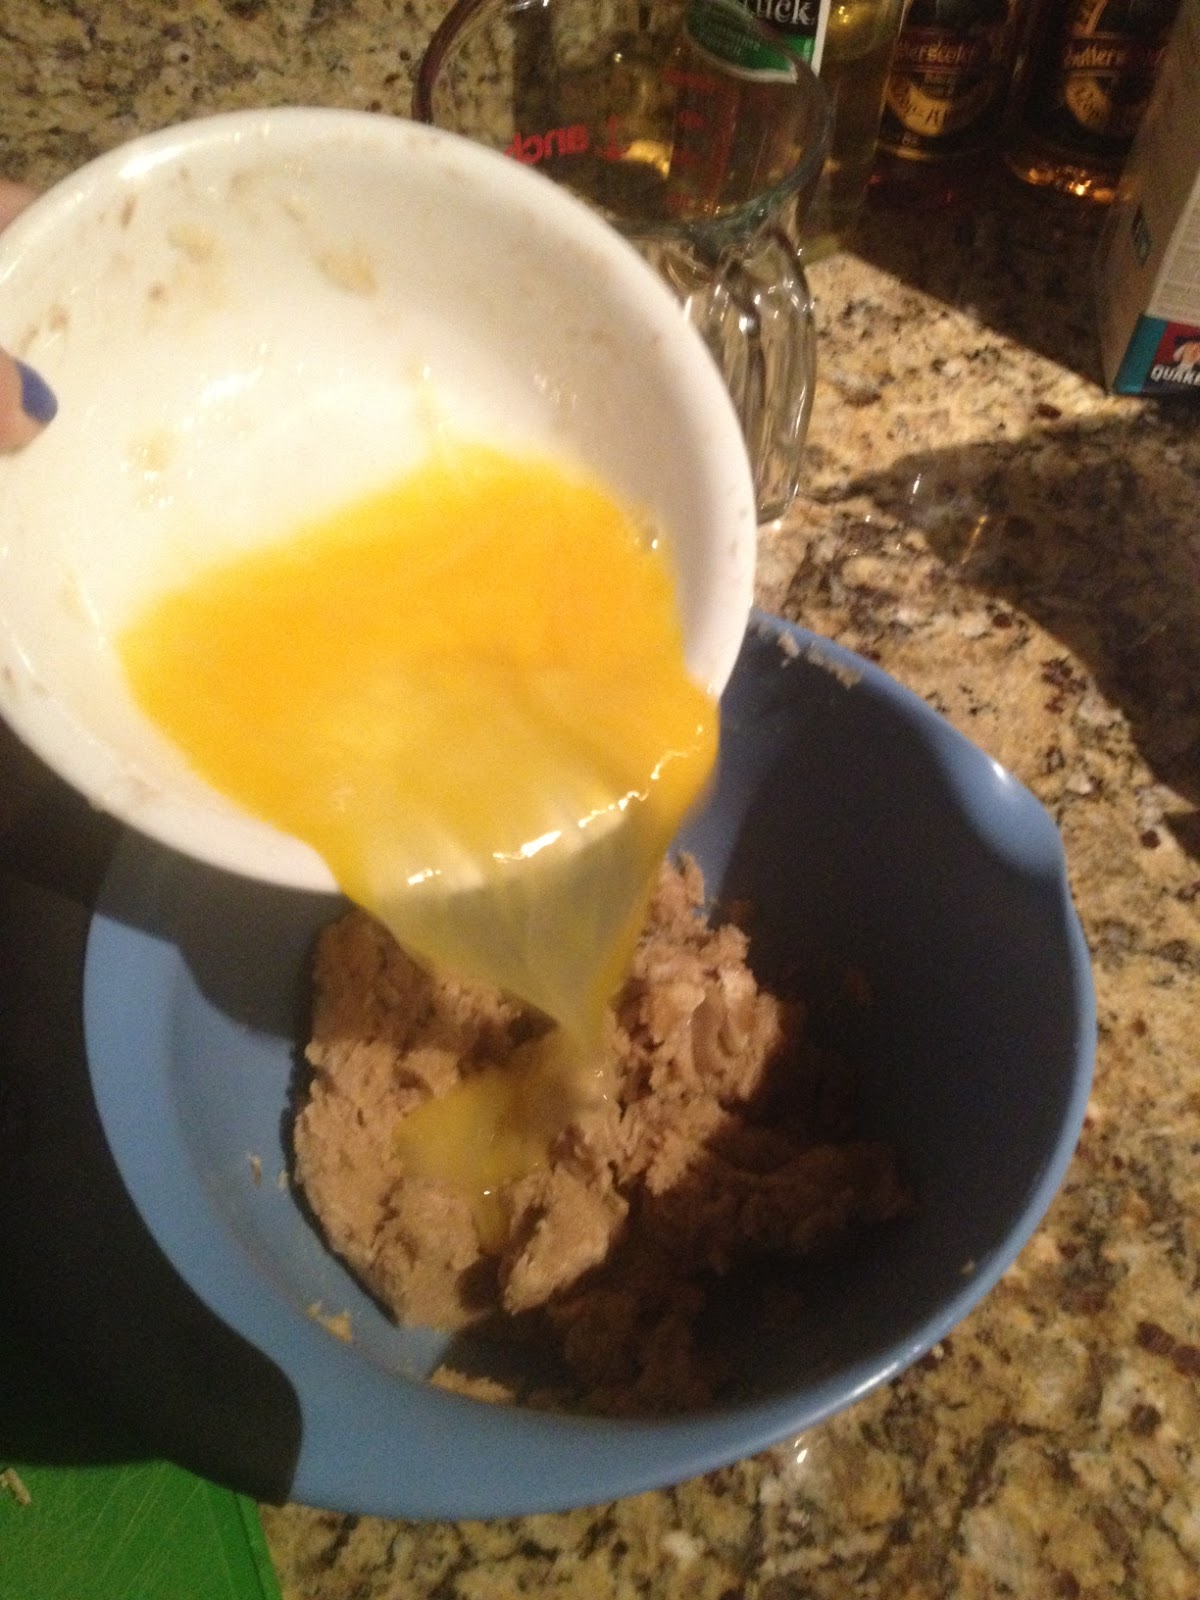
7) Crack those eggs in a tiny bowl and beat them if you haven't already. Slowly pour the egg mixture into bowl #2, and mix together.

Egg waterfall!
8) Pour the banana mush (slowly) into bowl #2 and incorporate it with the butter/sugar/egg mixture.
9) Grab bowl #1 (I'm sure he has been lonely) and slowly pour about a quarter of the banana/butter/egg/sugar mixture into the flour mixture. Mix and add more of the banana mixture. Repeat until the flour mixture is just moist.

Almost done!

10) Grease/butter/spray a loaf pan.
11) Pour the mixture into the loaf pan - it will be okay if the mixture almost reaches the top. I use a 9x5 clear Pyrex/Anchor loaf pan.
12) Bake for 60- 65 minutes.

It's a miracle!

13) Check the bread by inserting a toothpick into the center. If it's clean you are good to go. If the toothpick has batter goop on it, you want to up the oven temperature to 400F, and bake for another 5-7 minutes.

Just hanging out in the oven..
14) Once done, pull out of the oven and let cool. 
15) Eat, enjoy, pretend you are a monkey.

Additions/Alternatives:
  • 1/2 teaspoon nutmeg
  • 1/2 cinnamon
  • Chocolate chips (thanks, Rae)
  • Walnuts (just don't tell me about it)

Muffins: Pour into a prepared muffin tray and bake at 350F for about 20-25 minutes.


Words of wisdom: don't pull a Sylvia Plath and stick your head in the oven.


Enjoy!

Charlotte


Thursday, April 11, 2013

Thursday's Treat: Grandma's Pecan Pie

So maybe you're thinking to yourself "Hey, I miss all the delicious foods of the Holidays"...

What? You're not saying that? I'm the only one?

Whatever, I want delicious pie....


Grandma's Pecan Pie

I've always been told that Grandma Dorothy made fantastic pies, and that pecan was her best. My dad especially loved hers because it used real butter and no corn syrup. I vaguely remember her pecan pie being delicious, but by the time I got old enough to really enjoy her culinary feats, she had passed away. I'm pretty sure she took her special pecan pie recipe to the grave with her- but that just encouraged me to try (and fail) at a bunch of other pecan pie recipes.

Finally, I found a contender. This is a recipe I adapted from this one on All Recipes, and I used my house crust recipe (which is the one listed below). The best part of this recipe is that is doesn't use corn syrup, just like Grandma's!

CRUST:

1 1/4 cups all-purpose flour
1/4 teaspoon salt
1/3 cup butter
4 - 5 tablespoons cold water

1. Stir together flour and salt. Using a pastry blender, cut in butter until pieces are pea-size.
2. Sprinkle 1 tablespoon of the water over part of the mixture; gently toss with a fork. Push moistened dough to the side of the bowl. Repeat moistening dough, using 1 tablespoon of the water at a time, until all the dough is moistened. Form dough into a rough ball.
3. Wrap dough ball with plastic wrap and chill* in the fridge for 10-15 minutes.
4. On a lightly floured surface, use your hands to slightly flatten dough. Roll dough from center to edges into a circle about 12 inches in diameter.
5. To transfer pastry, wrap it around the floured rolling pin. Unroll pastry into a 9-inch pie plate (I use a clear Pyrex one). Ease pastry into pie plate, being careful not to stretch or tear pastry.
6. Rim pastry to 1/2 inch beyond edge of pie plate. Fold under extra pastry.


Dough all wrapped up and ready to chill.
 *You may be asking yourself, why can't I roll it out now?! But honey, you are using butter- not shortening, and that stuff warms up as you're forming the dough. If you were to try rolling out the dough now it won't be pretty. Don't believe me? You go right ahead- just don't come crying to me when the dough rips/stretches/tears as you're loading it into the pie pan.

PIE

Ingredients:

1 cup light brown sugar
1/4 cup white sugar
1/2 cup butter, plus extra
2 eggs
1 tablespoon flour
1 tablespoon milk
1 teaspoon vanilla extract (use the good kind, or it won't taste the same)
1 cup chopped pecans, plus more the decoration


Directions

1) Preheat oven to 400 degrees F
2) In a large bowl, beat eggs until foamy. This may take a while, so at some point take a breather and zap the butter.
3) Once eggs are foamy, stir in melted butter, brown sugar, white sugar, and the flour. Mix until well incorporated.
4) Stir in milk, vanilla extract, and pecans.
5) Lightly coat the bottom of the pie crust with butter. Pour mixture into the unbaked pie shell.
6) Bake in preheated oven for 10 minutes, then reduce temperature to 350 degrees and bake for 30-40 minutes.
7) I like to sprinkle some chopped pecan or crust cut outs on top of the pie 5-10 minutes before pulling it out of the oven.
8) Let cool for an hour, then enjoy! I like mine with vanilla ice cream.

Add ons:

Chocolate chips (sprinkled in the batter, or on top the baked pie)
Pastry cutouts with any extra dough left over from the crusts (see above!)


Enjoy,
Charlotte

Thursday, March 28, 2013

Thursday's Treat: Blackberry Buttermilk Cake

Since Caroline and I both love food, I thought it would only be appropriate to share some of our favorite recipes. Maybe this will be every Thursday.... maybe only once a month... who knows? Not me.

Up first is my tried and true summer staple. I'm pretty sure I made this at least 5 times last summer.


Blackberry Buttermilk Cake


Blackberry, Buttermilk, cake, Thursday's treat, dessert, sweets, cake
I stole this photo from my friend Anna L.
    

My recipe has been modified from this Bon Appetit recipe.
Ingredients:

  •  1 stick unsalted butter, room temperature, plus more for pan and parchment
  • 2 1/3 cups cake flour plus more for pan
  • 10 ounces fresh blackberries and/or raspberries (plus more for decor)
  • 1/4 cup plus 1 1/3 cups sugar
  • 1 1/2 teaspoons baking powder
  • 3/4 teaspoon salt
  • 1/2 teaspoon baking soda
  • 3 large eggs, room temperature
  • 2 teaspoons vanilla extract
  • 2 teaspoons orange juice (pulp is okay), plus more for icing option
  • 1 cup well-shaken buttermilk
  • Powdered sugar (for dusting)

    Equipment:
    Spring form pan (if available), parchment paper, oven (duh), Ziploc baggie (icing option)

    Steps:
    1. Make sure the oven rack is in middle of oven and preheat to 350°.
    2. Butter pan (or use a PAM vegetable oil spray); line bottom with a round of parchment paper. Butter parchment. Dust with flour; tap out excess. This butter+flour step is very important or your cake will look awful and the top will be ruined. 
    3. Arrange berries in a single layer in bottom of pan; sprinkle evenly with 1/4 cup sugar.
    4. Sift 2 1/3 cups flour, baking powder, salt, and baking soda into a medium bowl; set aside.
    5. Using an electric mixer (or your really strong arms), beat 3/4 cup butter and remaining 1 1/3 cups sugar in a large bowl at medium-high speed, occasionally scraping down sides of bowl, until pale and fluffy, about 2 minutes.
    6. Add eggs, one at a time, beating well after each addition.
    7. Beat in vanilla and zest.
    8. Reduce speed to low; beat in flour mixture in 3 additions, alternating with buttermilk in 2 additions, beginning and ending with flour mixture and beating just until incorporated.
    9. Pour batter over berries in pan; smooth top. 
    10. Bake until cake is golden brown and cake bounces back when pressed gently with fingertip, about 1 hour 25 minutes for a 9" pan and about 1 hour for a 10" pan.
    11. Let cool in pan set on a wire rack for 15 minutes, then run a thin, sharp knife around the edge of the pan to loosen.
    12. Remove pan sides. Invert cake onto rack and remove pan bottom; peel off parchment.
    13. Dust top generously with powdered sugar* and extra berries and let cool completely.
  • *Do this just before serving or it will dissolve into the cake and no one will see how pretty it is- because that's what really matters, after all.

      
    The topping method I prefer: Icing option
    Instead of dusting the cake with powder sugar you can give it a quick icing instead!

    1. Mix 1 tablespoons of orange juice with 1/4 cup of powder sugar in a Ziploc bag.
    2. Use your hands to mix the juice and sugar to form icing into a smooth consistency (watch out for lumps!)
    3. Add more sugar or orange juice as needed to get the consistency you desire. Chill icing.
    4. Right before serving cake arrange extra berries on top and snip corner of icing bag. Drizzle icing on cake in a cross hatch pattern. 

    Super cheat option if you're super lazy (or in a hurry!):
    Swap out the dry ingredients for this boxed cake mix (make sure it is the butter recipe!). Bake for 50 minutes.


    Blackberry, Buttermilk, cake, Thursday's treat, dessert, sweets, cake
    Icing option- my favorite!
      

    I'm really looking forward to making this again in the summer! And I want to try it with other berries.


    Blackberry, Buttermilk, cake, Thursday's treat, dessert, sweets, cake
    This photo was also stolen from Anna L.
      
    ~Charlotte